Wednesday, November 15, 2006

Calling a BPEL process with UTL_DBWS PLSQL package

After struggeling with low level SOAP calls from PLSQL. I was able to use the UTL_DBWS package. This package gives you an abstract layer on top of the low-level SOAP calls.

On OTN the latest version of this package can be downloaded.
You have to execute the following steps:

  1. Download the CallOut WebService zip file.
  2. Execute note: 276554.1 (located at metalink.oracle.com)
  3. Load under 'sys' account the files dbwsa.jar then dbwsclient.jar (from the previous donwloaded zip files)
  • loadjava -u sys/change_on_install -r -v -f -genmissing –s –grant public dbwsa.jar
  • loadjava -u sys/change_on_install -r -v -f -genmissing –s –grant public dbwsclient.jar
After this step, apart of errors during the loading of the jar files, you must load the two sqlfiles; utl_dbws_body.sql, utl_dbws_decl.sql as owner sys.

Now you should able to call a web service from the database, here is an example of calling a BPEL process based on a document style (rpc is also working).


DECLARE
service_ utl_dbws.SERVICE;
call_ utl_dbws.CALL;
service_qname utl_dbws.QNAME;
port_qname utl_dbws.QNAME;
xoperation_qname utl_dbws.QNAME;
xstring_type_qname utl_dbws.QNAME;
response sys.XMLTYPE;
request sys.XMLTYPE;
begin
-- Set a proxy if needed
-- utl_dbws.set_http_proxy('www-proxy.oracle.com:80');
service_qname := utl_dbws.to_qname(null, 'HelloWorld');
service_ := utl_dbws.create_service(service_qname);
--
call_ := utl_dbws.create_call(service_);
--
utl_dbws.set_target_endpoint_address(call_,
'http://oracle.nl:7779/orabpel/default/HelloWorld/1.0');
utl_dbws.set_property(call_,'SOAPACTION_USE','TRUE');
utl_dbws.set_property(call_,'SOAPACTION_URI','process');
utl_dbws.set_property(call_,'OPERATION_STYLE','document');
--
-- Set the input
--
request := sys.XMLTYPE('
<HelloWorldProcessRequest
xmlns="http://oracle.nl/HelloWorld">
<input xmlns="http://oracle.nl/HelloWorld">
1234abcd
</input>
</helloworldprocessrequest>');
--
response := utl_dbws.invoke(call_, request);
--
dbms_output.put_line(response.getstringval());
end;
/


The UTL_DBWS package is described here.

Thursday, November 02, 2006

Default Input in BPEL process

If you want a default input in your BPEL process you van do this in the BPEL.XML file as follows add the following code after the partnerLinkBindings tag:


<configurations>
<property name="defaultInput">
Here comes the default input,
this must be escaped XML
</property>
</configurations>

Friday, October 20, 2006

Calling a BPEL process from RAW PLSQL

There is a "nice" website for calling WS out of the database. The page is a bit complex, but it could work. I have spend some time on this, but... at the end I succeed (sse this article). But for those who want to build their own low level SOAP request read further.

So I choose to write a low level SOAP call from PLSQL.

We are using the UTL_HTTP database package and the XMLTYPE of the database. We are "hardcoding" the SOAP request for the server.

The following PLSQL function calls a synchronous BPEL process:


FUNCTION GetHelloWorldPayload
(
p_Payload IN VARCHAR2
)
RETURN VARCHAR2
IS
soap_request VARCHAR2(30000);
soap_respond VARCHAR2(30000);
http_req UTL_HTTP.REQ;
http_resp UTL_HTTP.RESP;
resp XMLTYPE;
response VARCHAR2(30000) := '';
l_detail VARCHAR2(30000);
i integer;
--
namespace VARCHAR2(128) :=
'xmlns="http://oracle.nl/HelloWorldPayload"';
endpoint VARCHAR2(128) :=
'http://host.nl:7779/orabpel/default/HelloWorldPayload';
BEGIN
IF ((p_DefaultDetail is null) or length(p_DefaultDetail) = 0)
THEN
l_detail := '';
ELSE
l_detail := p_DefaultDetail;
END IF;
soap_request:= '<?xml version = "1.0" encoding = "UTF-8"?>'
||'<SOAP-ENV:Envelope '
||'xmlns:SOAP-ENV="http://schemas.xmlsoap.org/soap/envelope/"'
||'xmlns:xsi="http://www.w3.org/1999/XMLSchema-instance"'
||'xmlns:xsd="http://www.w3.org/1999/XMLSchema">'
||'<SOAP-ENV:Body>'
||'<HelloWorldProcessRequest '||namespace||'>'
||'<input '||namespace||'>'||p_Payload||'</input>'
||'</HelloWorldProcessRequest>'
||'</SOAP-ENV:Body>'
||'</SOAP-ENV:Envelope>';
--
http_req:= utl_http.begin_request
(
endpoint
, 'POST'
, 'HTTP/1.1'
);
utl_http.set_header(http_req
, 'Content-Type'
, 'text/xml'); -- dealing with plain text in XML documents
utl_http.set_header(http_req
, 'Content-Length'
, lengthb(soap_request));
utl_http.set_header(http_req
, 'SOAPAction'
, 'process'); -- required to specify a SOAP communication
utl_http.write_text(http_req, soap_request);
--
http_resp := utl_http.get_response(http_req);
utl_http.read_text(http_resp, soap_respond);
utl_http.end_response(http_resp);
--
resp := XMLType.createXML(soap_respond);
IF (instr(resp.getStringVal(), 'ERROR:') > 0)
THEN
raise_application_error (
-20999,
'GetHelloWorldPayload: Failed! '||p_Payload);
END IF;
resp := resp.extract(
'/soap:Envelope/soap:Body/child::node()'
, 'xmlns:soap="http://schemas.xmlsoap.org/soap/envelope/"'
);
-- Remove namespaces
SELECT XMLTransform(resp,
xmlType(l_xsl_nonamespace)) into resp from dual;
--
resp := resp.extract(
'/HelloWorldPayloadProcessResponse/
HelloWorldPayload/child::node()');
--
if (resp is null)
then
dbms_output.put_line('GetHelloWorldPayload: resp3 IS NULL');
else
dbms_output.put_line('GetHelloWorldPayload: resp3 '
||resp.getStringVal());
end if;
--
i:=0;
LOOP
dbms_output.put_line(substr(soap_respond,1+ i*255,250));
i:= i+1;
IF i*250> length(soap_respond)
THEN
EXIT;
END IF;
END LOOP;
IF (resp is null)
THEN
response := '';
ELSE
response :=
replace(
replace(
replace(
resp.getStringVal(), '<', '<')
, '>', '>')
, '"', '"');
END IF;
return response;
END GetHelloWorldPayload;
/

Note l_nonamespace is as follows:

l_xsl_nonamespace VARCHAR2(640) :=
l_xsl_nonamespace VARCHAR2(640) := '<?xml version="1.0" encoding="UTF-8" ?>
<xsl:stylesheet version="1.0" xmlns:xsl="http://www.w3.org/1999/XSL/Transform">
<xsl:template match="comment()|processing-instruction()|/">
<xsl:copy>
<xsl:apply-templates/>
</xsl:copy>
</xsl:template>
<xsl:template match="*">
<xsl:element name="{local-name()}">
<xsl:apply-templates select="@*|node()"/>
</xsl:element>
</xsl:template>
<xsl:template match="@*">
<xsl:choose>
<xsl:when test="name() != ''xmlns''">
<xsl:attribute name="{local-name()}">
<xsl:value-of select="."/>
</xsl:attribute>
</xsl:when>
</xsl:choose>
</xsl:template>
</xsl:stylesheet>';


Thursday, August 10, 2006

Manipulating XML payload

Introduction

When you are using BPEL 10.1.2 and want to replace values in an XML payload. There are a few possibilities:

  • Using assign with from and to tags. In the to-tag you can add a XPATH queury. A disadvantage is that the XPATH query in the to-tag can not be dynamic.
  • Using XSLT stylesheet. This use more CPU intensive and additional files are needed to format the XML input to the desired output.
  • Using and expression function like addChildNode(), appendChildNode(). These functions are deprecated.
So what is the best way to handle XML? Thanks to murugac for his answer on the BPEL forum. I copied it to my blog to extract the reusable text.

Please don't use the addChildNode() function, this function is going to deprecated, instead use the new bpel extension insert/append (bpelx:append):

Syntax:
<bpel:assign>
<bpelx:append>
<bpelx:from ... />
<bpelx:to ... />
</bpelx:append>
</bpel:assign>

The from-spec within <append> yields a single node or a node list. (Please note: the from-spec of <bpel:copy> still MUST yield ONLY one node.) The node list will be appended as child nodes to the target node specified by to-spec. If the from-spec yields zero node, "bpel:selectionFailure" fault will be generated.

The to-spec MUST yield one single L-Value element node. Otherwise, "bpel:selectionFailure" fault will be generated. The to-spec cannot refer to a partnerLink.

See: appendChild (org.w3c.dom.Node)

Example: (XSD details at end of the document)

Consolidating multiple bills of material into one single bill of material by appending multiple "b:part" for one BOM to "b:parts" the consolidated BOM.
-----------------------
<bpel:assign>
<bpelx:append>
<from variable="billOfMaterialVar"
query="/b:bom/b:parts/b:part" />
<to variable="consolidatedBillOfMaterialVar"
query="/b:bom/b:parts" />
</bpelx:append>
</bpel:assign>
-----------------------

2. Insert
2.1 insertBefore
Syntax:
<bpel:assign>
<bpelx:insertBefore>
<bpelx:from ... />
<bpelx:to ... />
</bpelx:insertBefore>
</bpel:assign>

The restriction and semantics of from-spec under insertBefore is similar to those in the case of <bpelx:append>.

The to-spec under <insertBefore> MUST points to one or more single L-Value nodes. If more than one nodes are returned, the first node will be used as the reference node. The reference node MUST be an element node. The parent of the reference node MUST be an element node also. Otherwise, "bpel:selectionFailure" fault will be generated. The to-spec cannot refer to a partnerLink.

The node list generated by the from-spec will be inserted before the reference node.

See: insertBefore(org.w3c.dom.Node,%20org.w3c.dom.Node)

Example: (XSD details at end of the document)

Say before the execution of <insertBefore>, the value of "addrVar" is:
----------------------
<a:usAddress>
<a:state>CA</a:state>
<a:zipcode>94065</a:zipcode>
</a:usAddress>
----------------------

After the execution of the following:
----------------------
<bpel:assign>
<bpelx:insertBefore>
<from>
<a:city>Redwood Shore></a:city>
</from>
<to "addrVar" query="/a:usAddress/a:state" />
</bpelx:insertBefore>
</bpel:assign>
----------------------

The value of "addrVar" becomes:
----------------------
<a:usAddress>
<a:city>Redwood Shore</a:city>
<a:state>CA</a:state>
<a:zipcode>94065</a:zipcode>
</a:usAddress>
----------------------


2.2 insertAfter
Syntax:
<bpel:assign>
<bpelx:insertAfter>
<bpelx:from ... />
<bpelx:to ... />
</bpelx:insertAfter>
</bpel:assign>

<insertAfter> is very similar to <insertBefore>. Except:

If more than one L-Value nodes are returned by the to-spec, the last node will be used as the reference node.
Instead of inserting nodes "before" the reference node, the source nodes will be inserted after the "reference" node.

This operation can also be considered a macro of conditional-switch + (append or insertBefore).


Example: (XSD details at end of the document)

Say before the execution of <insertAfter>, the value of "addrVar" is:
----------------------
<a:usAddress>
<a:addressLine>500 Oracle Parkway</a:addressLine>
<a:state>CA</a:state>
<a:zipcode>94065</a:zipcode>
</a:usAddress>
----------------------

After the execution of the following:
----------------------
<bpel:assign>
<bpelx:insertAfter>
<from>
<a:addressLine>Mailstop 1op6</a:addressLine>
</from>
<to "addrVar" query="/a:usAddress/a:addressLine[1]" />
</bpelx:insertAfter>
</bpel:assign>
----------------------

The value of "addrVar" becomes:
----------------------
<a:usAddress>
<a:addressLine>500 Oracle Parkway</a:addressLine>
<a:addressLine>Mailstop 1op6</a:addressLine>
<a:state>CA</a:state>
<a:zipcode>94065</a:zipcode>
</a:usAddress>
----------------------

Monday, August 07, 2006

Using properties variables Part#1

Introduction

When programming in any language you often use properties to set particular variables. You use this to reduce "hard-coded" settings and to be independent of different environments. For Oracle BPEL thare are many solutions to use a property mechanism.

Variables
Within a BPEL process you can define variables and assign expressions to it. These variables you can use this in your BPEL process. While these variables are used along the BPEL proces, you define tprhese as global variables.

In the BPEL process an assign must be cartied out to set the variable:

<assign name="Assign_1">
<copy>

<from expression="'marc_soa@vijfhuizen.com'"></from>
<to variable="globalEmailAdress"></to>
</copy>
</assign>

BPEL properties
It is possible to define propertie settings within the BPEL process. The properties are set globally and outside the BPEL process. The properties can be accessed via a internal function.

In the bpel.xml file add the following lines, just before the end-of :

<preferences>
<property name="propertyEmailAddress">marc_soa@vijfhuizen.com</property>
</preferences>


The properties are accessed in the BPEL process (.BPEL file) via the ora:getPreference() function:

ora:getPreference('propertyEmailAdress')

In a next article, we discuss how to use properties from the database an call this via a single BPEL process.

Tuesday, August 01, 2006

Using ANT in a BPEL environment

Introduction

Updated: Sep 2007, for 10.1.3.3, download code here.

Oracle’s scalable application architecture in combination with the BPEL architecture combines the best elements to create a high available and high performance environment. Using tools to develop BPEL applications can be very complex when multiple environments exist.
In general there are the following environments;
  • Development
  • Test
  • Acceptance
  • Production
Depending on the customer requirements more or less environments exists.
This paper describes a solution to develop applications based on BPEL for multiple environments.

Overview

In general development of BPEL processes is done via an IDE tools. These tools are:
The first two products are graphical tools to design and develop BPEL processes. These tools can also be used for compilation and deployment of a BPEL process. The obant tool is part of the BPEL software stack and can be used to compile and deploy a BPEL process.
Combining these tools make is in general enough for designing and implementing BPEL applications.
It will be more complex if design and development must be done for various environments; developing new BPEL applications in development environment and fixing BPEL processes in a production environment.

Solution
The obant tool can compile from a current directory an ANT build.xml file. It will read the XML tags from this and interpret them. Oracle Jdeveloper generates this build.xml file when a new BPEL process is created.

It is possible to extend this “build.xml” file with other ANT tasks. But this is not logical. When developing BPEL applications, it will result in many BPEL processes, each having it’s own “build.xml” file.

A solution could be to have a general “build.xml” that is able to compile the BPEL processes.

A feature of the current obant tool, is that is only possible to use the core ANT tasks. It is not possible to use the optional tasks or even extend it with other tasks without changing the obant script.

The solution described in the next paragraphs will take this into account. The solution will cover the following features and can be easily change and extended to customer requirements:
  • Using full ANT tasks features
  • Multiple environments
  • Compiling multiple BPEL processes
  • Deployment to cluster environment
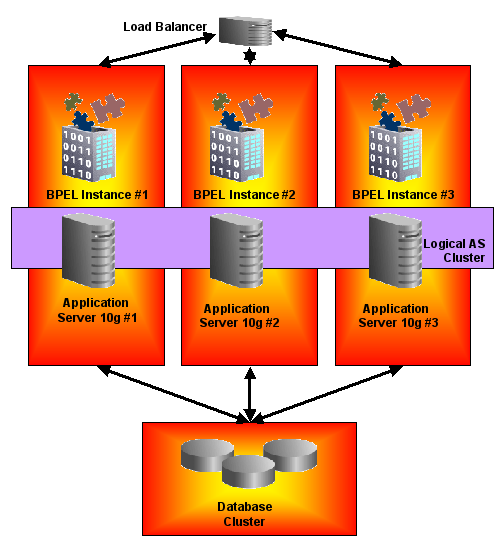
See also the white paper “Deploying BPEL processes in a High Available Application Cluster”

Directory Structure
Apart of using a version control tool to maintain all the files in a central repository, the files must be downloaded from this repository onto the hard drive. As source control tools as Oracle Source Control Management, SubVersion, CVS and ClearCase can be used.

The directory structure for this solution is as follows:

/home/mkelderm/projects/bpel
|-ant
|---doc
|---properties
|---templates
|-----async
|-----empty
|-----sync
|-source
|---default
|-----dev
|-------custom
|---------extlibraries
|---------html
|---------images
|---------java
|---------jdev
|-------HelloWorld
|-derived
|---default
|-----dev
|-------custom
|---------ear
|---------war
|-------ear
|-------stage
|-------HelloWorld
|---------jar
|-------war

The meaning of the directory names is mentioned in the next table.

Directory Description
/home/mkelderm/projects/bpel The base directory of the BPEL application
ant The location of the ANT scripts.
ant/doc The location of the documentation that you are reading.
ant/properties The location of the properties files that the ANT build script is reading. For each environment an separate property file is created.
ant/templates In this directory the BPEL templates are located. By default an empty, asynchronous and a synchronous BPEL process are located here.
source In this directory all the source code that is related to the BPEL application is located beneath here.
source/default The BPEL domain.
source/default/dev The environment that is valid for the BPEL application. By default ‘dev’ is used. This could also be ‘test’, ‘prod’ or even version number.
source/default/dev/custom Any addition code, non-BPEL processes, related to the BPEL application is located here. For example custom Java code.
source/default/dev/HelloWorld As example a BPEL process is located beneath the ‘dev’ directory. In this case the BPEL process HelloWorld. Each BPEL process has its own sub directory.
derived Any file that is not source code related but can be derived from the source code is located here. For example compiled BPEL processes (JARS), java classes, java documentation
derived/default BPEL domain
derived/default/dev Environment
derived/default/dev/custom Custom derived code; for example classes
derived/default/dev/HelloWorld The BPEL process HelloWorld containing the jar file.
derived/default/dev/ear The derived EAR file, used form deployment
derived/default/dev/war The derived WAR file, used form deployment


Based on the previous directory structure a script is made that takes control over these directories and fulfill the appropriate actions onto it. The script is made generic so that any other structure can be implemented.

Build Script: OBBUILD.SH - Configure
Based on the obant tool, as part of the Oracle BPEL PM 10g. A script is made that is able to full-fill the same functions. There are some differences. The script will use the full version of ANT, it will not use the tool obant.
The script expects that a full-version of ANT is downloaded and installed on the machine on the script executed. ANT and an additional library are found on the following locations:
The script is also expecting the Oracle BPEL PM is installed and configured on the server on which the script is executed.

The “obbuild.sh” will use the above ANT versions and reference to the Oracle BPEL environment. Within the three environment settings must be checked before this script can be executed. The settings are:

ANT_HOME=/home/mkelderm/projects/ant/apache-ant-1.7.0
ORACLE_HOME=/apps/oracle/products/10.1.3/as
ORABPEL_HOME=${ORACLE_HOME}/bpel
JAVA_HOME=${ORACLE_HOME}/jdk
ANT_JAVA_EXTENSIONS=/home/mkelderm/projects/bpel/tools/ant/lib


Build Script: OBBUILD.SH – Options
The script has a help function to show the possible options.

obbuild.sh -h
obbuild.sh [-[hvtV] [-e environment] [-f build-file]
[-r replace-file] [task] [arg1] [arg2] .. [arg6]]

-h Shows this help
-v Show the version of this program
-t Show all the tasks in the build file
-e Select envirnonment property file, default 'dev', reading dev.properties
-f Read a specific build file, default is build.xml in current directory
-r Read a specific replacement file,
use for promoting BPEL process to other environments.
-V Show verbose output
task The task to be executed, default is main
arg1..6 Optional arguments passed to the build file
as properties ANT.ARG1..ANT.ARG6


The script is reading a “build.xml” file to perform all the ANT tasks. By default it look in the current directory for the “build.xml”. With the option –f another build file can be mentioned. The –e option set the environment. In this file settings for a specific environment can be set; development, system test, production etc. By default it tries to read the “dev” environment; ./properties/dev.properties. The task is the task that ANT will be executed. By default it looks for the “main” task. Depending on the task, additional arguments can de given.

Build Script: OBBUILD.SH – Examples

obbuild.sh
Start the script with no arguments. It searches for the ./properties/dev/properties file and ./build.xml file and execute the “main” task of this file.

obbuild.sh –t

List all the tasks from the default build.xml file.

obbuild.sh –f /home/user/bpel/build.xml
It reads the build.xml from another location.

obbuild.sh –e systemtest
It reads the properties file named systemtest from ./properties/systemtest.properties.

obbuild.sh –f /home/user/bpel/build.xml –e systemtest CompileBPEL
Compile all the BPEL processes for the systemtest environment using a specific build file.

Build Script: build.xml
The build.xml file contains all the functions to maintain BPEL processes. Currently the following tasks are available


obbuild.sh -t
obbuild.sh: Tasks in ./build.xml
_Init - Internal: Initialize environment
_CleanSVN - Internal: remove svn files
_CheckoutLatest - Internal: Checkout the latest sourcecode from SVN
_CheckoutVersion - Internal: Checkout the particular version from SVN
[arg=version]
CreateDirs - Create directory structure
CreateNewProcess - Create a new BPEL process, based on a template
[arg1=bpel-process-template_name, arg2=bpel-process-name].
Compile - Compile one or all BPEL processes (
[arg=bpel-process-name])
DeployLocal - Deploy one or all BPEL processes to a domain
on the local server
[arg1=[Bpel-process|all]], [arg2=[domain-name|default]]
, [arg3=version|1.0]
Download - Download latest source code
[arg=version]
CreateWar - Create WAR file, containing all the BPEL processes
[arg=war-filename]
CreateEar - Create BPEL ear file
[arg=ear_filename]
main - Default task
Promote - Find/Replace on one or more BPEL processes,
see replace.properties
DeploySCP - Deploy one or all BPEL processes to a domain
on a remote server [arg1=[Bpel-process|all]]

CreateDirs
This task creates an initial directory structure as mentioned previously.

Example: For the prod environment create a new structure

obbuild.sh –e prod CreateDirs

CreateNewProcess
Create a new BPEL process based on a template.

Monday, July 31, 2006

Deploying BPEL processes in a High Available Application Cluster

Introduction
Oracle’s scalable application architecture in combination with the BPEL architecture combines the best elements to create a high available and high performance environment. This article describes a solution to deploy multiple BPEL processes into a high available application cluster.

Overview

In general the deployment of BPEL processes can be done as follows:
  • Using the Oracle BPEL console.
  • Using Oracle JDeveloper 10g.
  • Using the obant tool.
  • Copy files into the Domain’s deployment area on the BPEL server.
The first three deployment mechanisms are based on deploying a single process to the BPEL server. The last deployment mechanism can be used to deploy multiple files. While these solutions are working well for most common environments, it will be more complex when a clustered environment is in place. Most of the previous mentioned deployments must be executed multiple times, which can result into faults.

This article describes how to deploy BPEL processes to a clustered application server environment. In this scenario we will have three (3) instances of Oracle Application Server 10g. On each of the server an Oracle BPEL is installed. This is shown as example in the next diagram.


Each application server is added to a logical cluster. The cluster can be defined via Oracle Enterprise Manager 10g. This applies also for adding the application server instances to this cluster. It is assumed that the application servers are using the Oracle Database 10g for retrieving and storing their data. This database is made high available via Oracle Real Application Clusters.

Solution
Define a logical application cluster and add each application server to this cluster. This can be done via Oracle Enterprise Manager 10g.
  • Create an application cluster, e.g. “BPEL_AS_CLUSTER”.
  • Add each application server instance to this cluster.
After creating the cluster and assigning the application server instances, a cluster exists that contains three application instances. Create for this cluster an OC4J instance named, for example “OC4J_BPEL_DEPLOY”. This OC4J instance will marked as not started. Creating the OC4J instance is done via Oracle Enterprise Manager 10g.

After creating the OC4J instance, each application server will now have a local OC4J instance. The power of the OC4J instance, in other words a J2EE environment, is that it can deploy EAR and WAR files. Creating an EAR or WAR file and deploy this to the application server, results that this file will be unpacked in each OC4J instance.

Using this mechanism for BPEL processes, it confirms to the industry standard of J2EE deployment.

Create an EAR file that contains all the BPEL jar files that must be deployed. For example, create an EAR file with an application name “bpel_deploy” containing a web application named “files”. The names must be conforming to the EAR/WAR structure. In this example the EAR file contains a WAR file that contains the BPEL jar files.

bpel_deploy.ear
meta-inf/application.xml
files.war

files.war
web-inf/web.xml
bpel_ProcessTaks_1.0.jar
bpel_HelloWorld_1.0.jar
bpel_CreditRatingService_1.0.jar

Deploy the EAR file to the OC4J_BPEL_DEPLOY instance of the cluster. The trick is that the EAR file will be deployed to each OC4J instance on each application server! This results that all BPEL jar files are copied to all servers.

The deployment of the EAR file is done via Oracle Enterprise Manager 10g or via Oracle JDeveloper.
After this deployment the BPEL servers must me made aware that BPEL jar files have been deployed. Making the BPEL servers aware of these jar files is done once, only during the initial setup. This is done by replacing the temporary directory for BPEL processes on the server to point to the directory where the BPEL jar files are extracted from the EAR file.

This can be done as follows (UNIX example):

rm ${ORACLE_HOME}/integration/orabpel/domains/default/tmp

ln –s ${ORACLE_HOME}/j2ee/ OC4J_BPEL_DEPLOY /applications/bpel_deploy/files
${ORACLE_HOME}/integration/orabpel/domains/default/tmp


Each time a new EAR file is deployed, with all the BPEL jar files, the BPEL servers are aware that new BPEL processes are ready to apply in the BPEL server environment.

Conclusion
Using the EAR/WAR mechanism of J2EE for deployment of BPEL jar files, results in a more industry standard compliancy. The deployment is less complex to maintain in a high available environment. The risks of faults during deployment are reduced. Deploying the BPEL files is done in the same way as normal J2EE application. Deployment is done via HTTP or HTTPS protocol, making no need of special configuration in the network. Multiple BPEL processes are deployed at once.
BPEL Correlation
This usefull article is missing from Antony Reynolds'Blog. I have made an archive of it.

Where Did I Put That Process?

A BPEL process is initiated and makes a call to an ERP system to raise a purchase order, generating a purchase order number. Later that purchase order causes another system to raise an invoice and send the invoice to the BPEL process. How does the BPEL engine know which BPEL process should receive this invoice and process it. This is dealt with a thing called correlation.

From e-mails and phone calls that I receive it appears a lot of people struggle with BPEL correlation. It seems that the questions falls into two categories, why would I want it, and how do I do it?

What is Correlation?
Correlation is basicallly the process of matching an inbound message to the BPEL engine with a specific process. Normally this matching is hidden from us. Synchronous calls have no need of correlation because the conversation context is maintained on the stack or across a TCP connection. Consenting BPEL processes will usually correlate messages using WS-Addressing headers to pass around magic tokens that act like the session cookies in a web application.

Why Do I Need Worry About It?
Well most of the time you don't! As I mentioned before, calling another BPEL process or using a synchronous call will mean you don't have to think about it. You do need to worry about it in the following situations amongst others.
  • When using an asynchronous service that doesn't support WS-Addressing
  • When receiving unsolicited messages from another system
  • When communicating via files
In these casess we need to be able to tell BPEL to look at some content of the message in order to select the correct process instance to receive the message.

How Do I Get the Right Process Instance?

BPEL provides a construct called a correlation set to allow for custom correlation. A correlation set is a collection of properties used by the BPEL engine to identify the correct process to receive a message. Each property in the correlation set may be mapped to an element in one or more message types through property aliases as shown below.


Things to Remember About Correlation

I see some common misunderstandings about custom correlation. So lets knock them off now.
  • Only the process receiving the messsage needs to worry about correlation. As long as the sending service includes sufficient information in the message to be able to correlate it with previous activities there is no need for the sender to even be aware that correlation is occuring.
  • Correlation properties must be unique for the duration of the life of the BPEL process that set them. Make sure that you can't have two processes working with the same correlation tokens, for example using social security numbers to correlate an expense claims process would be a bad idea if an individual could kick off two seperate instances of the process.
  • Properties can be made up values or actual business identifiers such as purchase orders or numbers. They don't have to be strings, they can be any reasonable XML type.

A Quick Guide to Custom Correlation
Enough of the theory, how does it work in practice? Consider a process A that call a process B that calls a process C that calls a process A. This is one of the scenarios (113) in the BPEL samples distributed with Oracle BPEL PM.
So we have a cycle A->B->C->A. Three different asynch calls.

Note only process A needs correlation because only A receives more than one call. On the invoke from A to B we add a correlation in the correlation tab for the invoke using BPEL Designer. In here we will create the correlation set and create a property to correlate the exchange. We set this to initiate the correlation, meaning that it will associate this process with the given value.

On the receive from C to A we add the same correlation set with its property as we did for the invoke from A to B. However this time we mark the receive as not to initiate the correlation, meaning that the BPEL PM will use this to select the right process instance.

We now go to the BPEL structure diagram in the BEL Designer and add the property alias. We create two property aliases maping to appropriate elements in each message that will have the same value in message from A to B, as in the message from C to A. Note that the elements can be different names and in different structures in the two messages, but they must contain the same value if correlation is to work.

At this point BPEL designer has done almost everything. We need to manually edit the bpel.xml file and add the following XMl fragment to each partner link that will participate in the correlation.

Note that "correlationSet" is a fixed value. I have uploaded a sample of this process. Note deploying it may be tricky due to circular dependencies. How to deploy it is left as an exercise to the reader, but if the worst comes to the worst deploy an empty version of the process B, then deploy process A, then process C and then the real process B.

Useful References
Here are some useful references on correlation.

Friday, July 21, 2006

Oracle BPEL and ESB

Hi,

The goal of the blog is to spread my personal view and knowledge about the Oracle product named Oracle BPEL Process Manager.

As I can see the many customers are moving to a Service Oriented Architecture (SOA), the BPEL product of Oracle is often a good fit. The upcoming release with Enterprise Service Bus (ESB), the product will be named Oracle SOA Suite and will cover the complete SOA functionality that customers are expecting.
Currently Oracle does not have a real ESB product. Oracle Interconnect can act as an ESB, but is not integrated with Oracle BPEL PM.

Regards,

Marc